Showing posts with label diy projects. Show all posts

Monday, February 4, 2013

DIY Felt Hair Bow


Bows are perfect when you want to add a cute little detail to any outfit. You can wear them on a half tail, on a bun, on the side of your hair, just about anyway! Just get creative, and you are sure to get adorable results! Fortunately, they are also super easy to make too!


 1. Two strips of felt. One for your bow (the larger one) and one for the middle of the bow (the skinnier one). // 2. Small barrette // 3. Scissors // 4. Glue gun


 1. Grab the larger strip of felt and fold both sides. Make sure that both sides are even. Then use your glue gun to add a drop or two on each side of the bow. // 2. Once the glue is dry, clinch the bow in the middle. If one of the sides comes apart, add a little bit more glue, and then clinch it again. // 3. Now you can grab the skinnier felt piece and wrap it around the middle of the bow where you clinched it. Use as much of the skinny piece as you think works. I only went around the bow with it twice. // 4. Then you cut the skinny piece and add a drop of super glue. // 5. Now you can glue on your small barrette. // 6. You're finished! 

Theses bows are so easy and fast to make! You could even surprise a friend with a little handmade gift!

Happy crafting!

Thursday, January 24, 2013

Heartspiration


Lately, I have been wanting to sew a heart on everything! Whenever I see just a plain sweater, I just envision a heart on it. I don't know if there is a disorder that fits this description, but if there is I think I have it. Anyway, As I was sewing my heart onto this plain ol' purple sweater I was thinking that this would be a perfect Valentines day gift for someone. I know that if someone gave me something like this in another color, I would be a happy camper. I posted a tutorial on how to do this not too long ago here if you like the idea! Sweaters are just so comfy and perfect for this season. Why not cute-ify them with a heart?! The next project I plan on moving onto is heart elbow patches! A Beautiful Mess has a perfect tutorial on that, if you want to check it out!

Sunday, December 30, 2012

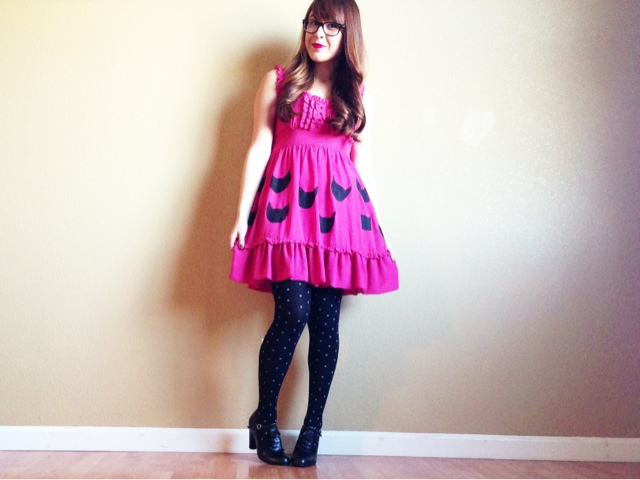
DIY Cat Dress

I always run into the cutest and loveliest things on Instagram. I can say that I get a lot of inspiration from the people that I follow and the comments from the people who follow me too. Recently, I ran into a picture of the cutest baby leggings with little cats on them on Kelli Murray's lovely feed (@kelli_murray on IG. You must follow her!). She had stamped cats on her baby daughter's leggings. When I saw them, I knew that I had to try to do it on one of my dresses.

Important Notes:

I used acrilyic paint on my dress since that is what I had at hand, but you can use fabric paint if you want too.

Try to use thick fabric so that the paint won't go through. I used a really thin material and the paint went through, and made things a lot harder.

Things can get pretty messy, so use a cardboard box to work on so you don't make a mess of your floors.

Most importantly, have fun!

Outfit details: Dress- Forever 21, Tights- Forever 21, Shoes- Jeffrey Campbell


Wednesday, December 19, 2012

Heart sweater D.I.Y

I like hearts. I like sweaters. But I LOVE heart sweaters. So I decided to turn one of my overly basic sweaters into my new favorite sweater. This D.I.Y project was really easy, and it could be done on any top you wish to transform in your closet.
 A few things you will need: Sweater (or any top you decide to use), Fabric (Size I used: 11"x9", You can make it bigger or smaller depending on the size you prefer), scissors, pins, embroidery thread and embroidery needle.

Step 1: You will need to cut your fabric into a heart. You can use a piece of cardboard as a stencil if you'd like. 

Step 2: Place the heart on the upper part of your sweater, and put pins on it to keep your heart from moving. 
 Step 3: You will need quite a bit of thread to get around the whole heart. So make sure you have enough thread on your needle before you start.

Step 4: Knot your thread on the end, and start stitching your way around the heart. You can also do this on a sewing machine. If you're going for a more handmade look, hand sewing it is the way to go.
 Step 5:  Once you have stitched all around the heart, make sure that the stitching will stay in tact by creating another knot. Now you're all done!

Here's the finished product! I felt like I was wearing a brand new sweater! I love the print of the fabric I decided to use as well! I have all of my favorite things in this outfit: bows, polka dots, chevrons, and hearts. Another thing I thought would be really awesome for this project is if metallic embroidery thread was used. I've seen this thread at craft stores like Joann and Micheal's. If you end up transforming one of your sweaters, I would love to see it! Link it to the comments or tag me on IG (@littleredbowtique)!

 Outfit Details: Sweater- Forever 21, Fabric on heart- Joann, Skirt- Forever 21, Shoes- Franco Sarto, Bow- American Apparel

Saturday, December 15, 2012

Leftover Wrapping Paper Ideas


I can imagine that many of you have already started wrapping your Christmas gifts. I just started today, and I still have quite a few to go. I probably won't wrap those until the day before Christmas since procrastination is in my nature. Anyway, today when I was finished wrapping some gifts I noticed that I had a lot of wrapping paper leftover. So I thought of a few ways that this pretty paper won't go to waste.

1. Make a present bow.

Step 1: Cut the leftover wrapping paper into small strips. If you want to make a bigger bow, you can cut it into bigger strips as well.


Step 2: Fold the strips into a ring.


Step 3: Then you will stack these strips on top of each other. I started by placing them into a cross. Then I placed two more diagonally. It'll start looking more like a bow now.


Final result: In the end, the bow should look a bit like this (or maybe even better).


2. Make a gift tag. 

To make a gift tag, all you will need is wrapping paper, card stock, glue, and string. All I did was cut both my wrapping paper and card stock into a square. Then I glued them together. The card stock keeps the wrapping paper from folding or rolling up. I didn't have a hold punch, so I used a needle to make a hole on the top of the gift tag. Once you have a hole, you put the string through it and you're set!


3. Make a Christmas card.

Making a Christmas card is much like making a gift tag, except it's just a bit bigger. The first step is to cut both the wrapping paper and card stock into a big square. Then you glue them together. Once they are glued together, you fold this square in half. Now you have a Christmas card! I decorated the inside with the left over wrapping paper as well. There is so much you can do with these scraps!


There is just something special about handmade goodies, especially during Christmas time! I hope these ideas come in handy for you! Just get creative, and don't let that pretty paper go to waste! If you have anymore leftover wrapping paper ideas, tell us! The more the merrier!